Daily theme Sunscreen

Good morning, dear photography friends! Today, we dive into the dazzling world of sunscreen. Let’s enjoy the sun together and creatively capture today’s theme. Whether you stay at home or find inspiration outdoors in the sunshine, take the opportunity to make sunscreen shine in your photos. We, the Photoclub community, look forward to seeing your sunny moments!


Creative Inspiration

Here are some ideas to creatively explore the theme of sunscreen:

  1. Sunny reflections: Capture the glow of sunscreen on the skin.
  2. Beach vibes: Showcase sunscreen in a summery beach setting.
  3. Contrast play: Use the contrast between sunscreen and water or sand.
  4. Close-up shots: Highlight the texture of the cream on skin or in the bottle.
  5. Color play: Experiment with the color palette of sunscreen and surroundings.


Technical Inspiration

Technical tips to illuminate the sunscreen theme:

  1. Light and shadow: Play with light to emphasize the cream on the skin.
  2. Macro shots: Use a macro lens to capture the details of the cream.
  3. Bokeh effect: Create a soft background to draw focus to the sunscreen.
  4. Color temperature: Adjust color temperature to influence the mood.
  5. Dynamic composition: Craft a lively composition with sunscreen and accessories.


Post-Processing Inspiration

Post-processing ideas for your sunscreen photos:

  1. Color correction: Enhance warm tones for a summery feel.
  2. High-key editing: Create a bright, airy atmosphere.
  3. Softening: Use softening effects for a dreamy vibe.
  4. Vignettes: Add gentle vignettes to focus attention on the cream.
  5. Creative filters: Experiment with filters to achieve a unique look.


Time to Get Creative!

Now it’s your turn, dear photography friends! Grab your cameras and show us how you capture the theme of sunscreen. We’re excited to see your radiant images and look forward to a creative exchange in our community.

See you at the next photo fun, your Toni.

Daily theme Gemini

Hello dear photography friends, today we dedicate ourselves to the exciting theme of "Twins." Dive with us into the world of doppelgängers and let's capture the uniqueness of each pair of twins together. Whether you spot twins in your neighborhood or search for double treasures in your photo archive, let's highlight the special bond and subtle differences between twins.


Creative Inspiration

Here are some creative approaches to the theme of twins:

  1. Reflections: Find reflections that show the twins in an interesting setting.
  2. Contrast: Place one twin in the sun, the other in the shade to emphasize opposites.
  3. Hide and Seek: Photograph one twin openly, the other hidden to spark curiosity.
  4. Same but Different: Highlight small differences in the twins’ clothing or poses.
  5. Natural Environment: Show twins in their familiar surroundings to create authenticity.


Technical Inspiration

Technical tips to skillfully showcase twins:

  1. Symmetry: Use symmetrical compositions to underline the unity of the twins.
  2. Depth of Field: Play with depth of field to highlight one twin.
  3. Changing Perspectives: Switch between close-ups and wide shots to create dynamics.
  4. Color Contrasts: Use color contrasts to make the twins stand out from the background.
  5. Light and Shadow: Experiment with light and shadow to influence the mood.


Post-Processing Inspiration

Post-processing ideas for your twin photos:

  1. Color Corrections: Emphasize certain tones to create a harmonious mood.
  2. Black and White: Try black and white to focus on expressions and gestures.
  3. Vignetting: Use a subtle vignette to draw attention to the twins.
  4. Creative Filters: Apply filters to create a special atmosphere.
  5. Double Exposure: Experiment with double exposure to achieve artistic effects.


Your Turn!

Now it’s your turn! Show us how you interpret the theme "Twins." We look forward to your creative ideas and are excited to see your photos. Remember, there are no limits to your creativity!

Until the next photo adventure, your Toni.

Daily theme Red Light

Hello everyone, today we’re diving into the fascinating topic of red light. A wonderful opportunity to play with light and shadow and see the world through the lens in a different light. Whether you’re out in the city or digging through your personal photo archive, let’s explore the many facets of red light together and express them creatively.


Creative Inspiration

Here are five ideas to creatively capture the theme of red light:

  1. City Nights: Explore the nightlife and capture the atmosphere of red-light districts.
  2. Abstract Light Play: Experiment with red light sources to create abstract patterns.
  3. Silhouettes: Use red backlighting to craft intriguing silhouettes.
  4. Mood Portraits: Illuminate your model with red light for a mysterious portrait.
  5. Red Light Reflections: Find reflections in puddles or glass surfaces that catch the red light.


Technical Inspiration

Use these tips to skillfully showcase red light in your photos:

  1. Long Exposure: Use a long shutter speed to capture the movement and dynamics of light.
  2. Red Color Filters: Apply red filters to transform ordinary scenes into red light moods.
  3. Bokeh Effects: Play with blur to turn red light into bokeh circles.
  4. Low-Key Shots: Focus on dark environments accented with red light.
  5. Contrast Adjustment: Enhance red tones in post-processing to amplify the effect.


Post-Processing Inspiration

Give your red light photos the finishing touch with these techniques:

  1. Hue/Saturation: Adjust hue and saturation to make the reds more intense.
  2. Selective Color Correction: Highlight the red elements in your images.
  3. Vignetting: Add a vignette to draw focus to the red light.
  4. Filter Effects: Experiment with various filters to create unique moods.
  5. Black & White with Color Accent: Combine black and white with selective red light accents.


Time to Try It Out!

Now it’s your turn! Dive into the world of red light and show us your creative interpretations. We’re excited to see your photos and look forward to your contributions. Remember, there are no limits to creativity!

See you soon and happy shooting, your Toni.

Daily theme Chocolate

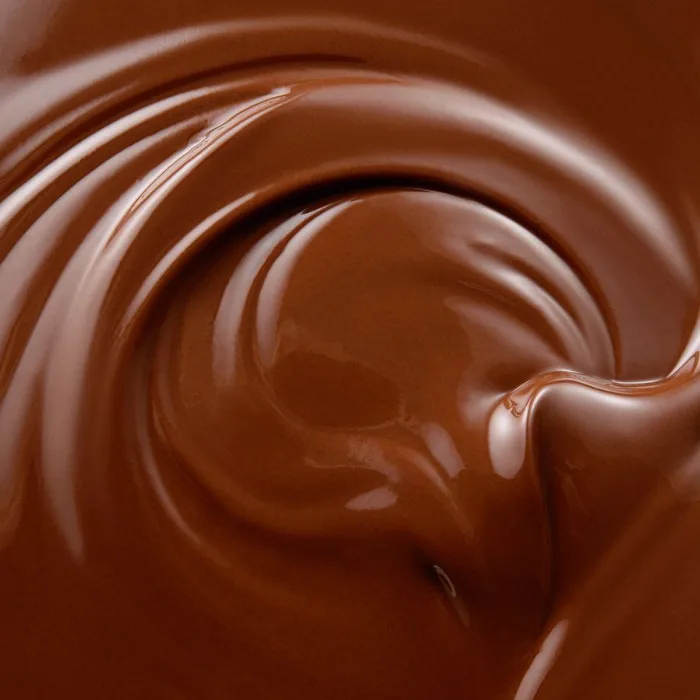
Chocolate – who doesn’t love it? This sweet, creamy delight that melts on your tongue and lets you forget the worries of everyday life for a moment. But how can we photograph this delicious pleasure in a unique and creative way? Let’s embark on this sweet journey together.


Capturing the Sweet Life

Photographing chocolate can be challenging, especially because of reflections and its melting properties. But with the right technique and a pinch of creativity, we can capture its sensuality and tempting allure. And remember: sometimes the journey is the destination – and in this case, a pretty delicious one.


Creative Inspiration

Let’s let our imagination run wild and explore some creative ways to photograph chocolate:

  1. Play with textures. Melted chocolate offers a fascinating surface that can create interesting patterns and reflections.
  2. Use colored backgrounds to create contrast and highlight the dark color of chocolate.
  3. Chocolate is not only a treat for the palate but also for the eyes. Experiment with different shapes and patterns.
  4. Get creative with lighting and shadows. They can emphasize the texture and form of the chocolate.
  5. Tell a story. Arrange the chocolate with other elements to create a scene or concept.

Technical Inspiration

The technical execution is also important to get the most out of your chocolate photos:

  1. Use a macro lens to capture details invisible to the naked eye.
  2. Work with a shallow depth of field to highlight the main subject and blur the background.
  3. Use a tripod to avoid camera shake and achieve sharp images.
  4. Experiment with different shutter speeds to capture various textures and effects.
  5. Play with white balance to create different moods.

Post-Processing Inspiration

Finally, post-processing is the cherry on top of our chocolate cake:

  1. Play with color correction to emphasize the rich color of chocolate.
  2. Use clarity and saturation settings to highlight the textures of the chocolate.
  3. Apply masking to enhance or soften specific areas of the image.
  4. Experiment with dodge and burn tools to subtly manipulate light and shadow and add depth.


Let’s Get Started!

Hopefully, this daily topic has awakened your sweet tooth and you’re ready to grab your camera and photograph chocolate from a whole new perspective. Remember, there’s no ‘right’ or ‘wrong’ way in photography, just different paths to express your artistic vision. So don’t hold back! Use today’s tips and tricks as inspiration, but don’t hesitate to bring your own unique ideas. With every click, you tell your story. Enjoy a day full of inspiring moments!


Best regards, Toni

Daily theme Hair

Hello dear photography friends! Today, everything revolves around the theme of hair. A fascinating challenge, isn’t it? Whether curly, straight, wild, or tamed – hair offers endless possibilities for creative photography. Let’s explore the versatility of this subject together and create stunning images. Whether at home, outdoors, or browsing through your archives, today we want to see your best hair photos!


Creative Inspiration

Here are five creative approaches to showcase hair:

  1. Portraits in the wind: Use a windy day to let hair flow naturally.
  2. Play with shadows: Experiment with light and shadow to create interesting patterns and textures in the hair.
  3. Color contrasts: Place colorful hair against a contrasting background to make the subject pop.
  4. Close-up details: Focus on individual strands or hair accessories.
  5. Reflections: Use mirrors or reflective surfaces for intriguing compositions.


Technical Inspiration

These technical tips will help you capture impressive hair photos:

  1. Softboxes: Use softboxes for soft light that emphasizes hair texture.
  2. Macro lens: For close-ups that reveal every hair in detail.
  3. Diffuser: Use a diffuser to avoid harsh shadows and smooth hair texture.
  4. Colored flash filters: Use colored flashes to make hair glow in different hues.
  5. Backlighting: Use backlight to create a glowing hair halo.


Post-Processing Inspiration

Here’s how to edit your hair photos for the perfect finish:

  1. Color correction: Adjust colors to make hair appear even more vibrant.
  2. Softening: Use a softening effect to make hair look smoother.
  3. Detail enhancement: Highlight textures and details in the hair.
  4. Vignetting: Add a subtle vignette to draw focus to the hair.
  5. Black and white conversion: Experiment with black and white to emphasize hair texture and shape.


Get ready for some photo fun!

Now it’s your turn! Show us your creativity and how you interpret the theme of hair. We’re excited to see your work and encourage you to try new things. Remember, there’s no right or wrong. We look forward to your submissions!

Until next time, enjoy your photography, your Toni.

Daily theme Backlight

Good morning, photography friends! Today, we dive into the world of backlighting – a fascinating topic that adds dramatic depth to our images. Let’s explore together how we can capture the emotions of our subjects through the interplay of light and shadow. Whether in your garden, on a walk, or in your photo archive, today we’ll creatively showcase backlighting.


Creative Inspiration

Here are some ideas on how to masterfully use backlighting:

  1. Silhouettes: Position your subject between you and the light source to create strong silhouettes.
  2. Rays: Find angles where light shines through trees or other objects to create a mystical atmosphere.
  3. Reflections: Use water surfaces to capture backlighting and its reflections.
  4. Bokeh: Play with out-of-focus background lights to create a dreamy bokeh effect.
  5. Contours: Highlight the contours of your subjects by placing the light behind them.


Technical Inspiration

How to use technical options for perfect backlight shots:

  1. Lens hoods: Use them to reduce stray light and lens flare.
  2. Adjust exposure: Experiment with manual exposure to find the optimal light-dark balance.
  3. Spot metering: Use it to focus exposure on your main subject.
  4. ND filters: Employ neutral density filters to avoid overexposure.
  5. High Dynamic Range (HDR): Use HDR to bring out details in both bright and dark areas of your image.


Post-Processing Inspiration

With these post-processing tips, you’ll get the best out of your backlit shots:

  1. Lights and shadows: Adjust them deliberately to enhance the mood of your image.
  2. Color correction: Experiment with warm and cool tones to influence the atmosphere.
  3. Increase contrast: Boost contrast to make silhouettes stand out more clearly.
  4. Sharpening: Emphasize details in bright areas without blowing out the dark parts.
  5. Vignetting: Add a subtle vignette to emphasize the main subject.


Let’s Go on a Photo Hunt!

Now it’s your turn! Grab your cameras and show us how you master backlighting. Remember, there are no fixed rules – let your creativity run free. We look forward to seeing your unique perspectives.

See you tomorrow and have fun with backlighting, your Toni.

Daily theme Mills

Today, it's all about mills, our daily companions in the landscape. Let's discover together how we can capture the elegance and history of these structures through our lenses. Whether you find them nearby or browse through your photo archive, today we put mills in the spotlight. We, the photographers, preserve these majestic witnesses of time.


Creative Inspiration

Here are some tips on how to creatively capture mills:

  1. Look for mills in different lighting conditions to vary the mood.
  2. Use the landscape around the mill to convey a sense of place.
  3. Experiment with perspectives – try shots from below or use drones.
  4. Observe the play of shadows and light on the mill’s sails.
  5. Photograph details like the wooden framework or mechanics to tell the story.


Technical Inspiration

Here are some technical tricks to capture mills optimally:

  1. Use long exposures to capture movement like spinning mill sails.
  2. Play with depth of field to separate the mill from the background.
  3. Work with different focal lengths to emphasize the mill’s size and presence.
  4. Use filters, such as polarizers, to make the sky more dramatic.
  5. Apply HDR photography to highlight details in bright and dark areas.


Post-Processing Inspiration

Here’s how you can enhance your mill photos in post-processing:

  1. Use color correction to highlight the natural colors of the mill and surroundings.
  2. Adjust contrast and brightness to emphasize the texture of wood and stone.
  3. Use selective sharpening to bring out the mill’s details.
  4. Experiment with black-and-white editing to create a timeless look.
  5. Apply vignetting to draw focus to the mill.


Show Us Your Masterpieces!

Now it’s your turn—let your creativity run free and capture the beauty of mills. Share your stories and experiences, and let’s explore the world of photography together. These tips are just the beginning—your vision makes the image unique.

Discover the world of mills, your Toni.

Daily theme Fish

Good morning, dear photography friends! Today, everything revolves around the fascinating theme of fish. We invite you to embark on a creative journey of discovery, whether at the nearest pond, your home aquarium, or in your photo archive. Let’s bring the world of fish to life together in our images and share our impressions. It’s exciting to see how each of us captures the theme in our own unique way.


Creative Inspiration

Here are some creative ideas to showcase the theme of fish:

  1. Underwater worlds: Experiment with shots of fish underwater.
  2. Fish portraits: Focus on the details and textures of individual fish.
  3. Reflections: Use water reflections to create a special mood.
  4. Contrasts: Place the fish in an unusual context or background.
  5. Capturing movement: Freeze the dynamic motion of the fish.


Technical Inspiration

Technical tips to illuminate the theme of fish:

  1. Macro shots: Use a macro lens to highlight small details.
  2. Play of light: Work with light to emphasize the colors and shapes of the fish.
  3. Speed: Use a fast shutter speed to freeze motion.
  4. Depth of field: Experiment with depth of field to make the fish stand out.
  5. Creative perspectives: Seek unusual angles to photograph the fish.


Post-Processing Inspiration

Post-processing ideas for your fish photography:

  1. Color adjustment: Enhance the vibrant colors of the fish.
  2. Softening: Use softening effects to create a dreamy atmosphere.
  3. High-key editing: Create bright, airy images to evoke a gentle mood.
  4. Color filters: Experiment with color filters for special effects.
  5. Black and white: Try converting images to black and white to focus on form and texture.


Let’s Go on a Photo Hunt!

Now it’s your turn! Grab your cameras and show us how you interpret the theme of fish in your images. We look forward to your creative insights and are excited to share in the exchange within our vibrant community.

Until the next creative adventure, your Toni.